| cosam.org |
Replacing ROMs
Most A1200s come with version 3.0 ROMs, which of course work fine with the supplied software. However, if you want to use Amiga OS 3.9, you'll need the newer 3.1 ROMs. These are quite readily available separately, and not too hard to fit yourself, but remember to take precautions to avoid damage from static electricity.
The original ROMs are located in two sockets near the trapdoor connector. To remove them, an IC extractor tool is of course ideal if you can get hold of one. Failing that, they can be removed by gradually prying each end out with a knife or screwdriver, i.e. lift one end out a bit, then the other, and so on. Just be careful not to damage the motherboard - there are exposed tracks directly under the ROM chips!
Most new chips never fit into sockets, and the 3.1 ROMs I got hold of were no exception. You'll probably need to bend the legs inwards slightly to allow them to fit more easily. This is best done by holding the chip at each end and pressing the pins against a flat surface. Check the legs against the socket to see if you've gone far enough - it takes a surprisingly strong force to bend those tiny pins.
You should now be at the stage where the legs of the ROM chips line up nicely with the slots which will be receiving them. The sockets are actually longer than the chips that fit in them, and the "spare" holes should be left at the end towards the PCMCIA connector. This is the same end that the notches indicating pin 1 of the chips should be located.
There are, as before, two chips which must of course be inserted into the correct sockets. The chip with part number 391773 goes in U6A and 391774 goes in U6B, as labeled on the motherboard. If you ever need to put the 3.0 ROMS back, the last digit of the part number of each ROM is the same as its 3.1 equivalent.
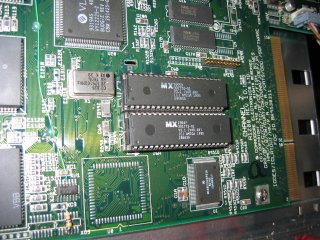 The fitted ROMs, showing the position and orientation. | 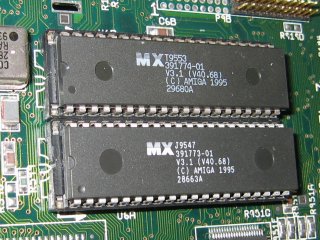 Close-up of the ROMs - notice the empty socket holes on the left. |
You already know what a pain it is to get those things out, so double check everything before putting the new ones in. Making sure you have the right chip in the right socket, in the right holes, and the right way round, a firm, even push should send them home. Again, if you've never done this before, you may be surprised how much force is required to get them properly seated. The important thing is that each end goes in at the same time so as to avoid bending the legs. Your milage may vary, but my ROMs went so far in that the chip casing was in contact with the socket (this wasn't the case with the 3.0 ROMs).
Next: Testing and Troubleshooting >>
![]()
![]()
![]()
![]()