| cosam.org |
Mounting the Motherboard
As the motherboard was expressly designed to fit in its own case, mounting it in another is not completely straight forward. Although the "front" egde of the board has ample mounting holes, the side with all the connectors on it does not. However, as the connectors themselves are solidly soldered to the board and have holes for screws in them, we can use them to give the board the all-round support it needs.
You may wish to make use of the original metal shield, or at least the underside of it, by mounting it and the motherboard as one unit using stand-offs and spacers (option 1 in the diagram). Another option is to use stand-offs for the proper mounting holes and fashion some angled brackets to fix to the rear ports (option 2). You may even be able to wangle something to make use of the hard disk mounting bracket holes, although this may leave the narrow end of the board a little wobbly.
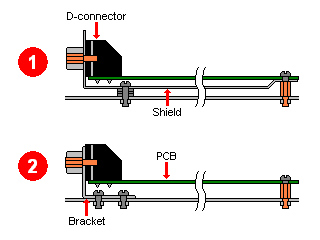 A couple of options for mounting the board. |
Of course, how you do it all depends on your own requirements. If you want to have all the ports sticking out the back of the box, using the metal shield is a good plan as you then only need to cut out a rectangular hole. If you prefer to keep the whole board inside the case, you can go either way.
I personally found the metal shield a bit untidy, not to mention a health hazard due to its rather sharp edges. I decided to ditch it and use the combination of regular stand-offs and some angle brackets for the ports. I found that the centres of the holes in the sub-D connectors were 8mm from the bottom of the board. Simple calculations show that the centres of the holes in the backets should be 16mm from the bottom when using 8mm stand-offs.
The brackets themselves are made form an old hard disk cage, but are basically bent 6mm x 1mm strips of steel with three holes in them. The hole in the short end is intentionally off-centre so that the bracket will fit next to the connector itself, where there is only about 5mm of space. The brackets also have a long end with two holes with which they're fixed to the case to stop them wobbling sideways.
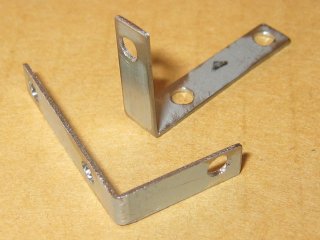 The mounting brackets I made - thankfully you don't see much of them when the mobo's in place. |  Motherboard tray with stand-offs and brackets screwed on. |
I marked up the case's motherboard tray with the locations of the stand-offs and drilled two holes for them. If you drill through from the front of the tray you're likely to leave a small burr on the back, which also helps keep any stand-offs or screws in place. The centres are 220mm apart and 18mm from the bottom of the tray (allowing for the rail into which the tray slides). The stand-offs I used (which I believe are pretty standard PC parts) screwed nicely into the 3mm holes without having to cut a thread before hand. If you have a variable speed drill, you can get a nice straight result using a socket attachment to screw the stand-offs in at low speed. Failing this, they also fit nicely in a the chuck itself. If you can't reach the hole with the drill, you can always screw it in from the back first to make a thread, then undo it and pop it in the front.
With the two stand-offs in place, I stuck a high density foam rubber pad to the tray in the area of the IDE connector. I'm not sure if it still makes contact with the board, but it feels somehow safer this way when you plug something into the header! It also meant I could screw the motherboard in and it'd stay roughly parallel to the tray. I then screwed my angle brackets to a couple of choice connectors using the original screws which previously fixed them to the RF shield. I chose the left-most holes of the monitor and external floppy connectors; not only are they in a good position for stability, but they're also connectors I don't intent to use in the future. I then marked the positions of the brackets before dismantling the whole assembly again to drill the necessary holes in the tray. Again, these were 3mm holes, into which a PSU-type screw fits nicely.
With all four supports in place, the motherboard can be mounted in its final position. If you're using a right-angle PCMCIA adaptor, you'll probably want to connect this now! The whole lot can then be slid into the back of the case, but watch out for cables and switches towards the front end. Before you screw everything in, you may want to finish off any modification of the case, or at least the motherboard tray.
Next: The Keyboard >>
![]()
![]()
![]()
![]()