| cosam.org |
Hard Disks and CD-ROM Drives
The A1200 has a single-channel, build-in IDE interface, meaning you can connect two devices to the internal IDE header where the hard disk usually fits. There are also plenty of expansion cards which will allow you to use SCSI drives, which will generally give you better performance and flexibility.
Using the Original Hard Disk
If your A1200 came with a hard disk, the chances are it's a 2.5" IDE beastie. If you can secure the mounting bracket and don't plan on connecting any other IDE devices, you can leave it where it is.
Otherwise, you'll probably want to mount it elsewhere in the case. You'll of course need a longer cable and some way of mounting the drive. There are kits available from mounting 2.5" drives in 3.5" bays. If your local PC shop doesn't have such a kit (they're also used for mounting notebook PC drives in desktop/tower cases) have a look for dealers on the web.
Using 3.5-inch Hard Disks and CR-ROM Drives
Just because the IDE header on the motherboard is a tiny 44-pin thing, doesn't mean you can't use 40-pin IDE drives, such as those used in most PCs. IDE is IDE, so in theory anything that says IDE, EIDE, ATA or ATAPI on it should work fine. There are however a few devices (mostly CD-ROM drives) which claim to be IDE but, as they don't adhere to the standard completely, won't work with your Amiga.
3.5" drives are generally cheaper and more readily available than their 2.5" cousins. A CD-ROM drive is also invaluable these days, the most common models being 40-pin IDE units. Whatever your local PC dealer tells you, cables do exist with both 44-pin (2.5") and 40-pin (3.5") connectors. The chance of you finding one in a store probably isn't so good, but there are plenty of dealers on the web and such cables pop up every now and then on eBay.
Another option is a 44-to-40-pin adapter. This is just a bit of PCB with a 44-pin header connected soldered to one end and a 40-pin one on the other. Only 40 pins are connected as the rest are used to power a 2.5" drive. You could maybe argue that this option is less reliable, but it does give you a larger choice of cables. It's however not much use if you have a combination of 40-pin and 44-pin drives.
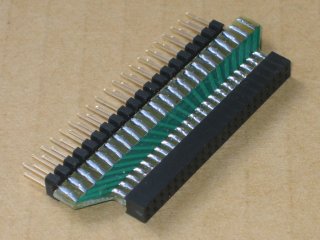 A simple 44-to-40-pin adaptor. | 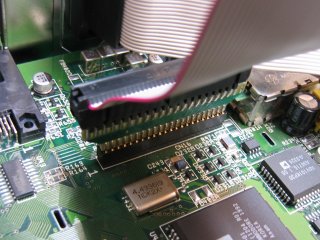 The adaptor and a regular IDE cable fitted to the motherboard. |
You could also make a custom cable yourself (not easy, as the connectors are significantly different in size) or get one made for you (probably rather expensive).
Connecting Up
If you're familiar with PC hardware, you probably know the basics of IDE devices already. If not, you'll probably want to find yourself a primer on the web.
If, like me, you only need one hard disk and a CD-ROM drive, this is easily set up using one cable connected to the internal IDE header. Set the hard disk to master, the CD-ROM to slave and away you go. Of course, you could connect a second hard disk instead of a CD-ROM drive in the same manner. My 3.5" hard disk was available in the "HD Toolkit" utility using scsi.device, but I needed to install IDEFix 97 (avaibale from Aminet) before the CD-ROM drive was recognised.
If you want to use more than two IDE devices, there are adapters available that allow this (up to four devices I believe). If you want to connect more than that, you really ought to consider getting a SCSI card.
Next: Reset Button >>
![]()
![]()
![]()
![]()