| cosam.org |
Power Supply
The power supply is a pretty essential part of the project, but by no means difficult. It doesn't need to be anything fancy, but most games require at least +5V and +12V DC. The JAMMA standard also specifies that a -5V supply be present, although this isn't required for most games. The amount of power required differs depending on the kinds of boards you want to hook up. Some SuperGun builder say you can get away with a small power supply in the region of 150 Watts. Many original arcade cabinets came equipped with 15 Amp power supplies. If in doubt, go for something bigger than you need. Using a 500 Watt supply which can deliver 20+ Amps on +5V and +12V may be overkill, but all that power isn't going to break anything; the system will only ever draw as much power as it needs.
As luck would have it, all of the above voltages are output by a standard, readily available PC power supply. Many people use big ATX power supplies, but I wanted something a little less bulky which could be installed in the finished product's case. Possible sources are PSUs designed for use in mini PCs (e.g. Mini-ITX or FlexATX supplies) or lower profile server chassis. The former may be lacking in power output though, and the latter can be very large length-wise to compensate for the small cross-section.
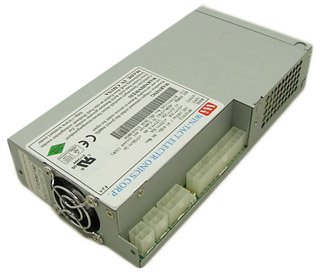
I ended up with this little beastie. Designed for servers, it's rated at 400 Watts yet measures just 100x200x41mm. Maybe this is too good to be true, but I won't be going anywhere near what the manufacturer claims this thing is capable of. It doesn't have a -5V output, but this can be derived from -12V with a simple voltage regulator, like a 7905. Being a server PSU, the original fan was pretty loud so I replaced it with something a little more civilised.
Note that PC power supplies are designed to be switched on and off by the PC itself. In order to get it to power up, you'll need to fit a switch over the PS-ON (green) and GROUND (balck) lines. If your PSU has its own switch on the back, you can short these permanently and use this switch to turn the unit on and off.
Connecting up the PSU is simplicity itself. I opted to use a simple connector block: PSU at one end, JAMMA connector and other stuff at the other. Use nice thick wires for this, like 18AWG or more, to safely carry the current to the JAMMA board.
Next: SCART RGB Video >>
![]()
![]()
![]()
![]()