| cosam.org |
MikroTik RouterBOARD 500

| Model: | MikroTik RouterBOARD 500 |
| In service since: | April 2005 |
| Function: | Internet Gateway/Firewall |
Linux Hacking on the RB500
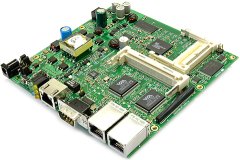
The MikroTik ![]() RouterBOARD 500
RouterBOARD 500 ![]() is a single
board computer, or SBC, which features a MIPS CPU and is able to run Debian
GNU/Linux from an internal Compact Flash (CF) Card. I thought this would be
an ideal replacement for my
old Pentium 133Mhz Internet gateway machine. The
RouterBOARD 500 sports 3 Ethernet ports (for my simple home network, Internet,
DMZ and internal LAN connections are therefore catered for) and consumes much less
power than the PC. It's also a fraction of the size, measuring just 14cm x14cm, plus
the case. Not only that, but compared to the Pentium, the RouterBOARD is even a step
up in terms of performance!
is a single
board computer, or SBC, which features a MIPS CPU and is able to run Debian
GNU/Linux from an internal Compact Flash (CF) Card. I thought this would be
an ideal replacement for my
old Pentium 133Mhz Internet gateway machine. The
RouterBOARD 500 sports 3 Ethernet ports (for my simple home network, Internet,
DMZ and internal LAN connections are therefore catered for) and consumes much less
power than the PC. It's also a fraction of the size, measuring just 14cm x14cm, plus
the case. Not only that, but compared to the Pentium, the RouterBOARD is even a step
up in terms of performance!
Having seen that MikroTik also provided CF images containing a pre-installed Debian system, I took the plunge and bought one. For many people, these images are great: simply use the dd utility to write the image to a CF card (which you can access with an inexpensive CF reader for your PC), plug it into the RouterBOARD and away you go. But for the rest of us, who like to customise our systems to the max, the provided images just wouldn't do - I wanted to replace the supplied kernel almost right away after finding out that many of the cool features I was used to on my PC-based router/gateway weren't compiled in and couldn't even be added as modules. Stuff like SSH and even syslogd didn't work properly, because basic things like support for Unix domain sockets were lacking.
So, if you're like me and want to customise your RB-500's Debian installation,
you'll need a couple of things. First off, apart from the rather obvious items
such as the RouterBOARD itself and a suitable CF Card, you'll need a card reader.
I got an "internal" model which cost less that €20 and fits into
a 3.5" or 5.25" drive bay. The cable from this then leaves the case though
a spare PCI backplate and fits into an external USB slot. This sounds daft until you
realise you may need to dis/reconnect the thing now and again to refresh things. The CF
card and reader work through SCSI emulation, like USB thumb drives. When connected, the
kernel assigns the card a virtual SCSI block device, which you can then partition, format,
read from, write to and whatever.
See this guide to USB mass storage ![]() for more info on how to get this side of things working.
for more info on how to get this side of things working.
Careful - potential loss of data! On my IDE-based system, the CF card shows up as /dev/sda - on your machine, especially if you're using Serial ATA or SCSI equipment, this may be different! Make sure you know which device has been assigned (check the console output, for example) or you could end up overwriting important data on your hard disk(s)! |
The other thing you'll need is a Debian reference image from
MikroTik's RouterBOARD 500 page ![]() .
At time of writing, there are images for CF cards of 128Mb or 1Gb. The contents of the
filesystems on these images are pretty much (if not entirely) identical. Unfortunately,
cards of these sizes won't allways necessarily match the images byte for byte. For
example, my "1Gb" card has a capacity of 1,024,450,560 bytes, which doesn't
match the image, as we can see:
.
At time of writing, there are images for CF cards of 128Mb or 1Gb. The contents of the
filesystems on these images are pretty much (if not entirely) identical. Unfortunately,
cards of these sizes won't allways necessarily match the images byte for byte. For
example, my "1Gb" card has a capacity of 1,024,450,560 bytes, which doesn't
match the image, as we can see:
$ unzip rb500-1024.img.zip
$ ls -l rb500-1024.img
-rw-r--r-- 1 steve steve 1077608448 Mar 24 17:35 rb500-1024.img
Hmmm... so dd-ing this onto my CF card isn't going to work - it's simply too big. Fortunately we can still access the data on the image by mounting the appropriate partition through a loopback device. In order to do this, we need to know a little about the geometry of the image. Something like fdisk will do the job fine:
$ /sbin/fdisk -l rb500-1024.img
Disk rb500-1024.img: 1077 MB, 1077608448 bytes
16 heads, 63 sectors/track, 2088 cylinders
Units = cylinders of 1008 * 512 = 516096 bytes
Device Boot Start End Blocks Id System
rb500-1024.img1 1 8 4000+ 27 Unknown
rb500-1024.img2 9 2088 1048320 83 Linux
Ok, so we have two partitions: one of about 4Mb, which we'll come to later, and another which takes up the rest of the 1Gb. We can see that the second partition is of type 83 and therefore a regular Linux partition we can mount on our machine. The problem is, we're dealing with a regular file here, not a block device, so we need to figure our where in the image our partition starts. Thankfully, we can work this out pretty easily from the above data using this formula:
Offset (in bytes) = Heads x Sectors x Cylinders x Block Size
16 x 63 x 8 x 512 = 4,128,768 bytes
So we can mount the partition like this:
# mkdir -p /mnt/cf
# mount -o loop,offset=4128768 rb500-1024.img /mnt/cf
# ls /mnt/cf
bin cdrom etc home lib mnt proc sbin tmp var
boot dev floppy initrd lost+found opt root sys usr vmlinux
Cool! There's what we were after - the root filesystem of the CF image. If you just want to use the supplied kernel, but the image doesn't quite match your CF card's size, it's merely a matter of:
-
dd-ing the first partition as-is to the CF card. We already know
it's 4,128,768 bytes, which is 8064 blocks of 512 bytes.
# dd if=rb500-1024.img of=/dev/sda bs=512 count=8064
- Repartitioning the CF card using fdisk, cfdisk or whatever. I prefer cfdisk myself, but it doesn't seem to handle bad partition tables too well. I used fdisk to remove the invalid second partition, which ended after the end of the media, then cfdisk to write the new partition table. I just made one large partition - using more than two or three doesn't seem to work very well for some reason.
-
Making a filesystem on the new partition, and mounting it somewhere.
# mke2fs /dev/sda2
# mkdir -p /mnt/newcf
# mount /dev/sda2 /mnt/newcf
-
Copying the root filesystem to the partition, and umounting it.
# cp -a /mnt/cf/* /mnt/newcf
# umount /mnt/newcf
Your CF card can then be plugged into the RouterBoard. Set the boot device to CF and away you go!
If, however, you want to use a custom kernel, or your CF card is a completely different size than (and therefore has different geometry to) the image, things are a little trickier. This can get pretty involved, depending on the level of customisation you want to achieve. If you're new to Linux, you'll probably want to enlist a knowledgable freind to help you out. Still up for it? Good - let's begin...
Unless you fancy compiling the kernel on the RouterBoard itself (which can be done
on a 1Gb CF card, although I wouldn't recommend it!) you'll need either another MIPS machine
or a cross-compiler to create mipsel-linux binaries, that is, binaries for the
little-endian MIPS architecture. This isn't too hard, especially if you follow
this HOWTO for Debian ![]() .
If you're using another OS or distro: Google
.
If you're using another OS or distro: Google ![]() is your freind.
is your freind.
As if that wasn't enough, you'll need to apply the patch from
MikroTik's RouterBOARD 500 page ![]() .
To compile my kernel, I unpacked a fresh 2.4.29 tarball into /usr/src and
applied the patch there:
.
To compile my kernel, I unpacked a fresh 2.4.29 tarball into /usr/src and
applied the patch there:
# cd /usr/src
# unzip linux-2.4.29.patch.zip
# patch -p0 < linux-2.4.29.patch
I also needed to edit /usr/src/linux-2.4.29/Makefile, setting "CROSS_COMPILE" to "mipsel-linux" and reverting "kgcc" back to "gcc". I also changed the "tool-prefix" in /usr/src/linux-2.4.29/arch/mips/Makefile back to "mipsel-linux-". I then configured the kernel, using the default configuration provided by the patch as a reference:
# cd /usr/src/linux-2.4.29
# cp config.mipsel .config
# make menuconfig
You may of course prefer to use a different method for configuring the kernel. The file config.mipsel provides the correct configuration options for things like the CPU and other built-in hardware. Surprisingly though, the via-rhine driver for the NICs was not compiled in, so I enabled this.
Another problem I came across was setting the kernel parameters. Without the correct settings,
you'll end up with a kernel panic when you try to boot as things like the location of the root
filesystem are not known to the kernel. I've yet to study the mechanism used by the images
supplied by MikroTik for setting these options, so my current solution is to make use of
CONFIG_CMDLINE to hard-code the required values into the new kernel.
[Update: the much more elegant solution using objcopy is documented on the
MikroTik Wiki ![]() here
here ![]() .]
One snag is that
this option isn't directly supported by the architecture we're building the kernel for. I got
around this by editing around line 700 of arch/mips/kernel/setup.c like this:
.]
One snag is that
this option isn't directly supported by the architecture we're building the kernel for. I got
around this by editing around line 700 of arch/mips/kernel/setup.c like this:
#ifdef CONFIG_CMDLINE
strncpy(command_line, CONFIG_CMDLINE, sizeof command_line);
#else
strncpy(command_line, arcs_cmdline, sizeof command_line);
#endif
This means we can copy the options specified in .config into the command line buffer at boot time. Probably not the most elegant solution, but it works. The options themselves are defined during configuration by enabling "Default bootloader kernel arguments" (under "General setup") and setting the default parameter string. In any case, the resulting .config should contain something like this:
CONFIG_CMDLINE_BOOL=y
CONFIG_CMDLINE="root=/dev/cfa2 gpio=16375 console=ttyS0,115200 HZ=165000000
mem=32764K kmac=00:09:22:22:22:00"
This line is taken from the dmesg of a MikroTik Debian image. You'll probably want to set kmac to the MAC address of the Korina NIC, as noted in the documentation supplied with your routerboard (or on a sticker on the case, or the board itself).
With the configuration done, it's time to get compiling. If you're used to compiling on x86, note that there's no bzImage target - vmlinux is what you need. To save a few bytes, the resulting kernel can be stripped, as shown. If you configured some modules, don't forget to build them, too.
Careful - don't overwrite your host's own modules. Of course, if your host machine is running the same kernel version, watch that you don't overwrite your current modules! You can do this by temporarily moving the appropriate subdirectory under /lib/modules out of the way. |
# make deps
# make vmlinux
# mipsel-linux-strip vmlinux
# make modules
# make modules_install
If you're not working on a MIPS machine, you'll probably get a whole bunch of warnings if you attempt to install the modules. This isn't a problem, as long as the modules are installed to /lib/modules where we can get at them. Remember to copy the subdirectory under /lib/modules on your host machine to the same directory on the CF card.
OK: so you've got your kernel, but what are you meant to do with it now? As you probably guessed, it's not just a matter of updating the bootloader - there isn't one, at least: not on the CF card, so this next part can take a hack or two to complete. This example is based on the 1Gb image featuring a 2.4.29 kernel, but it should apply to others. The whole process is detailed so that it should be possible to figure out the required steps for future releases.
As we saw way back at the beginning, the CF image is split into two partitions. Whilst there's a vmlinux in the root of the filesystem on the second partition, this isn't the kernel which will be booted when we run off the CF card. The "live" kernel is on that mysterious first partition, which fdisk tells us is of an unknown type. The kernel image is simply written serially to the partition at a particular offset. So in order to replace the kernel, we first need to know where it is.
First, lets see what we're meant to be looking for. Here's a dump of the first few bytes of the vmlinux in the root filesystem on the second partition. This is a standard ELF header.
$ hexdump -vC /mnt/cf/vmlinux | head -n 3
00000000 7f 45 4c 46 01 01 01 00 00 00 00 00 00 00 00 00 |.ELF............|
00000010 02 00 08 00 01 00 00 00 40 c0 3d 80 34 00 00 00 |........@.=.4...|
00000020 1c 51 26 00 01 10 00 50 34 00 20 00 03 00 28 00 |.Q&....P4. ...(.|
Then let's have a look through the first partition of the image for ELF headers. The parameter to head is calculated by divinding the size of the partition in bytes by 16, the number of bytes hexdump prints per line.
# hexdump -vC rb500-1024.img | head -n 258048 | grep ELF
00000200 7f 45 4c 46 01 01 01 00 00 00 00 00 00 00 00 00 |.ELF............|
00007e00 7f 45 4c 46 01 01 01 00 00 00 00 00 00 00 00 00 |.ELF............|
001bfcd0 00 00 00 00 7f 45 4c 46 00 00 00 00 2f 75 73 72 |.....ELF..../usr|
Well, our search pattern wasn't perfect, but it looks like we found two valid ELF headers. Let's take a closer look:
$ hexdump -s 0x200 -vC rb500-1024.img | head -n 3
00000200 7f 45 4c 46 01 01 01 00 00 00 00 00 00 00 00 00 |.ELF............|
00000210 02 00 08 00 01 00 00 00 40 40 3c 80 34 00 00 00 |........@@<.4...|
00000220 48 e9 24 00 01 10 00 50 34 00 20 00 02 00 28 00 |H.$....P4. ...(.|
$ hexdump -s 0x7e00 -vC rb500-1024.img | head -n 3
00007e00 7f 45 4c 46 01 01 01 00 00 00 00 00 00 00 00 00 |.ELF............|
00007e10 02 00 08 00 01 00 00 00 40 c0 3d 80 34 00 00 00 |........@.=.4...|
00007e20 1c 51 26 00 01 10 00 50 34 00 20 00 03 00 28 00 |.Q&....P4. ...(.|
Thankfully, they're both slightly different. The second one matches that of the vmlinux on the second partition, so this ought to be it! This can be confirmed by comparing some more bytes after the header, which is left as an exercise for the reader ;-)
So we now know that the "live" kernel starts at 0x7e00 in this image, which translates to 32256 bytes in decimal, or 63 blocks of 512. We should therefore be able to overwrite the kernel on our CF card directly like so:
# dd if=/usr/src/linux-2.4.29/vmlinux of=/dev/sda bs=512 seek=63
Incidentally, the number of blocks we need to skip is equal to the number of sectors per track on the device in question. This is also true for the 128Mb image, although it of course pays to check the offset before dd-ing your kernel into the wrong part of the CF card. For different-sized CF cards, you may need to experiment with this value. If you get things running on such a card, please let me know so I can amend this guide!
Phew! Assuming you got this far without too much hair loss, now's the moment of truth. Stick the CF card into the RouterBOARD and, at startup, make sure the boot device is set to CF. If you have the immense good fortune that it works first time: congratulations - and you're welcome ;-) It took me a several attempts to get to this stage, so I came across a few different errors:
-
Kernel panic: VFS: Unable to mount root fs on 01:00
This happens if you don't set the root kernel parameter, you set it incorrectly, or you simply don't have a valid filesystem on there. Set the option in CONFIG_CMDLINE as above, ensuring that CONFIG_CMDLINE_BOOL is set to "y" to enable the option. Ensure the kernel will read the command line in by editing arch/mips/kernel/setup.c. Make sure the root filesystem is valid by mounting it using your trusty CF card reader. You didn't overwrite it with a particularly large (> about 4Mb) kernel, did you? -
Bootloader says: Not an elf header
The bootloader can't find the kernel image on the first partition of the CF card. The chances are you've written it to the wrong place, or somehow overwritten or corrupted the image. For 128Mb cards, the image should start at 0x4000 and for 1Gb cards 0x7e00. For other cards, I'm afraid you'll just need to experiment! A good starting point seems to be:512 bytes * Number of sectors per track on CF device
-
Other errors
Problems with the kernel can be difficult to diagnose as a lot of kernel messages, especially those early on in the boot process, aren't sent to the serial port. Don't be afraid to dive into the code and change some printk()s into panic()s, which are output through the serial port. If all else fails, revert to a known-good kernel configuration and gradually adjust your options to see what could be causing the problem.
Another thing you may wish to consider when running Linux on your RouterBOARD is making use of the onboard NAND storage. This usually contains MikroTik's RouterOS, which you probably won't need any more. Indeed, if you're having trouble booting from CF, this may be the solution to your problems as it's also possible to install a custom kernel here and boot from NAND. The NAND also provides you with up to 64Mb of non-volatile storage, should you be short of space on your CF card. If your installation is small enough, you could install Linux directly to NAND and eliminate the need for a CF card entirely.
To access the NAND storage, you'll need to create some device files in /dev, like this:
# mknod /dev/mtd0 c 90 0
# mknod /dev/mtd1 c 90 2
# mknod /dev/mtdblocka b 31 0
# mknod /dev/mtdblockb b 31 1
The NAND chip, like the CF images, is split into two partitions - one of 4Mb and another filling the rest of the device. The filesystem used is yaffs, so your kernel will need to support this (the CF images' kernels do). Mounting is as simple as:
# mkdir -p /mnt/nand1
# mount /dev/mtdblocka /mnt/nand1
In the first partition is a file named kernel which will be loaded if you set the RouterBOARD to boot from NAND. You can therefore simply copy you own image over this via a filesystem on the CF card.
![]()
![]()
![]()
![]()