| cosam.org |
Console and Bootstraps
The front panel is a fine interface for simple operations, but to do anything serious, I was going to need to connect a console device. Machines of this era were often supplied with teletypes or other printer-based consoles which I'd like to add some time, but aren't the most practical of options for general tinkering. The machine came with a DL11 module which can be used to connect 20mA or EIA (now better know as RS-232) serial terminals. I also recently received an M9312 bootstrap/terminator (and a spare) with a few ROMs, one of which should provide a basic console emulator over the serial interface.
The DL11 had a cable fitted, ending in some kind of 6-pin connector that,
from the connected pins, looked to be a 20mA job. It didn't fit anthing I
have so using the pinouts in
the manual ![]()
![]() [23.5MB] I was able to whip up an EIA version using a bit of CAT-5 and a
DB-9 connector. The other end goes into a 40-pin Berg connector, for which
I "recycled" an old IDE ribbon cable. The pinout is shown in a table
towards the end of this report.
[23.5MB] I was able to whip up an EIA version using a bit of CAT-5 and a
DB-9 connector. The other end goes into a 40-pin Berg connector, for which
I "recycled" an old IDE ribbon cable. The pinout is shown in a table
towards the end of this report.
 Original cable wasn't of much use to me... | 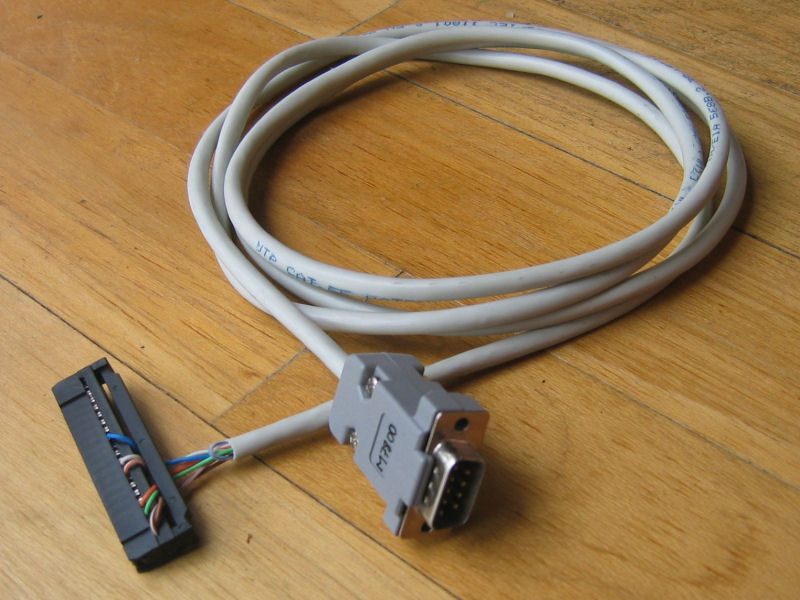 ...but a replacement isn't too hard to make. |
Configuring the DL11 can be quite a job with its numerous solder-in jumpers, rotary switches and such like. You can even replace the clock crystal in this thing to provide different baud rates. Although the field guide mentioned it was a 110 to 2400 baud device, the 4.608 MHz crystal fitted was good for 9600 bps. Thankfully, the jumpers were all set just as I'd have liked them, as were the rotary switches, although the latter had to be turned round to the start in order to discover at which position they were actually set.
Next the M9312 needed to be set up. It also features plenty of solder-in jumpers, all of which were again good for what I wanted to do. The other configuration is an address offset, set by means of a DIP switch. This allows you to select whether a bootstrap will be run at power-up (set position 2 to ON to enable this) and, if so, which one. I wanted to boot automatically into the console emulator to test the connection, so I used this table from chapter 3 of the manual:
| Mode | Address | 1 | 2 | 3 | 4 | 5 | 6 | 7 | 8 | 9 | 10 |
| Console emulator with diagnostics |
165020 | ON | --- | OFF | OFF | OFF | OFF | ON | OFF | OFF | OFF |
| Console emulator without diagnostics |
165144 | ON | --- | OFF | OFF | ON | ON | OFF | OFF | ON | OFF |
The M9312 was fitted in place of the existing Unibus terminator in the Unibus Out slots of the last backplane.
With a null modem cable connecting the homebrew cable above to my VT220 serial terminal, I powered the machine up. The screen remained blank as apparently the auto-boot feature wasn't working just yet. Nevermind: the start address can be toggled in and the console emulator run manually. The standard version's address 165144 was loaded and I hit Start... Bingo! The PDP-11 printed the expected register value dump followed by the "@" prompt. Only problem was, I couldn't type anything in...
Checking the cable revealed no loose connections. I did however notice that the "interlock" signals were connected with an arrow in the manual's pinout table. Were they meant to be connected on the cable? On closer inspection, the original had a short wire connecting the 20mA interlock signal to the TTY "serial in" pin, so I did the same on my own cable, only with the EIA interlock signal (that is, pin M to pin E). The complete pinout of the console cable was therefore:
Console cable pinout
| Signal | Berg | DB-9 |
| Ground | A, B, UU, VV* | 5 |
| Serial In (TTY) | E | - |
| TX | F | 3 |
| RX | J | 2 |
| EIA Interlock Out | M | - |
| CTS | T | 8 |
| RTS | V | 7 |
| DTR | DD | 4 |
* take your pick of these - I used pins A and B.
With that last thing fixed, I could carry on and try out the console emulator. Looks like the power-on automatic boot is also working - maybe the terminal wasn't fully booted up last time. Apart from the bootstrap commands, there's not all that much to play with in the console emulator. You only get to L(oad), D(eposit) and E(xamine) locations and S(tart) programs off. However, a working console is a great stepping stone to more exciting projects...
Next: Unix V5 Preparations >>
![]()
![]()
![]()
![]()