| cosam.org |
Mag-Stik Plus Modification
Introduction
The Mag-Stik Plus is an arcade-style joystick produced by Ultimarc ![]() . Instead of using a
spring, the Mag-Stik range uses a magnetic mechanism for centring the
joystick. One unique benefit of the joystick is that it can be
switched between 4-way and 8-way configurations simply by pulling and
rotating the joystick, removing the need to venture under the control
panel.
. Instead of using a
spring, the Mag-Stik range uses a magnetic mechanism for centring the
joystick. One unique benefit of the joystick is that it can be
switched between 4-way and 8-way configurations simply by pulling and
rotating the joystick, removing the need to venture under the control
panel.
Most agree that the Mag-Stik is durable and well engineered, but one common complaint keeps surfacing in reviews: the joystick relatively stiff in use and therefore requires more force to move than some would like. This was also my only complaint about these otherwise great joysticks, so I decided to see if they could somehow be modified to reduce this resistance. The following guide explains the method I used to achieve this.
How The Mag-Stik Works
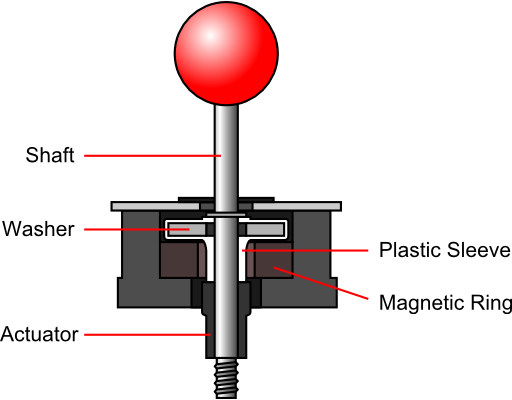
The basic theory of opertaion is simple and follows the approach of most modern arcade joysticks on the market today. Pressing the joystick in any of the four cardinal directions activates a microswitch mounted on the bottom of the joystick assembly. In 8-way mode, pushing the joystick in a diagonal direction activates two switches. So nothing new there, then.
The joystick shaft fits snugly into a white plastic sleeve which houses a large metal washer. Inside the body of the joystick, a magnetic ring attracts the washer, which keeps the shaft centred when at rest. Pushing the joystick pulls the washer away from the magnetic ring. When the shaft is released, the magnetic attraction pulls the stick back to the centre position.
So... What's the Problem?
There are two places in the joystick which provide resistance when the joystick is pushed: the microswitches and the magnetic centring system. I have read about at least one Mag-Stik user who was able to reduce the resistance by replacing the stock microswitches with "softer" switches. I however found that even with all the microswitches removed, the stick was still too stiff for my liking. Additionally, the action was not smooth; moving the joystick requires more force to initially pull the washer away from the magnet, at which point it "let's go" and the stick moves much more easily. This leads to a somewhat jerky feel. It was therefore obvious I would need to do something which would reduce the magnetic force between the washer and the magentic ring.
Experimentation
Looking at the joystick, it was pretty clear that the magnetic ring wasn't going to be easy to remove. I therefore started out by trying to move the washer away from the ring; after all, magnetic force decreases by the square of the distance. For this I used a cardboard spacer between the ring and the washer's plastic sleeve. This worked to a degree, but as space above the sleeve is restricted by the mounting plate, I couldn't get enough space between the two without binding.
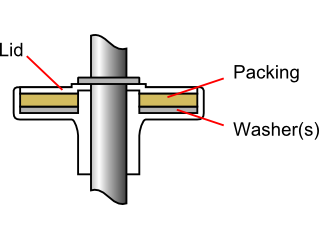
I next looked at the white sleeving itself and discovered that it wasn't sealed shut, as I'd originally thought. It is made of two parts, a main body and a kind of "lid" which simply clicks into place. The lid can be removed by poking a sharp-ish instrument like a screwdriver into the gap between the two parts. This reveals the honking great metal washer, which I removed for the time being. Reassembling the stick, I found that the resistance of the microswitches alone was enough to keep the shaft centred, although overall the stick was now too loose. I figured I must be able to find a sweet spot somewhere between these two extremes.
I started hunting through draws and cupboards for something metal I could use in place of the large washer. Experimenting with smaller washers and tiny nails, I found that it didn't take much metal at all to get the stick springing back nicely without being overly stiff.
Tuning the Solution
I wasn't too happy about using loose washers or nails in the joystick which could "migrate" in use and glueing them in place didn't seem right either. I was going to need some washers to play with, but they were going to have to be big enough to evenly fill the available space and yet thin enough as not to provide too much attraction to the magnet. In the end I settled for some home-made washers with the same dimensions as the original, only much, much thinner - thin enough that I was able to snip them out of a steel drinks can! I simply used the original washer as a template and sharp scissors to do the cutting.
One of my beer can washers wasn't quite enough; the stick would snap back OK, but there was now too little resistance felt when pushing the stick. There was also a bit of "end float" in the shaft as removing the large washer allowed the plastic sleeve's lid to sit slightly lower in the main body. This was easyily enough to fix by padding the void out with yet more home-made washers, this time cut from thick cardboard. The great thing about all these washers (even if they are a pain to cut out) is that you can pretty precisely tune the stick's resistance by just adding one metal washer at a time. For really fine adjustment, you can alter their distance from the metal ring by placing them either above or below the packing washers. I ended up with two metal washers in the bottom and two cardboard washers in the top. In any case, the total thickness needs to be the same as the original, which is about 4mm or 0.160".
![]()
![]()
![]()
![]()