| cosam.org |
Tips and Techniques
Sketching
It may sound surprising, but a seasoned astronomer will often be able to see more detail than a beginner in the exact same view. This is because the experienced observer's eye and brain are better "trained" at picking out those faint, elusive details that a beginner would often miss. Sketching is therefore not only a great way to record your observations, you'll also be training your eye at the same time! So even if you're no good at drawing, there's still reason enough to break out that paper and pencil.
Eventhough I'm not bad at sketching in the traditional sense, I like to spend as much time as possible behind the eyepiece, as opposed to sitting there recording every detail with precision. A quick scribble with a few notes is however generally enough to refresh your memory at a later date, when you have more time to make a more reputable rendering. Brushing up your sketches is also something to do on those long, cloudy nights!
I like to make my sketches on a computer. Not only can I get a better representation of what I saw, but it makes it very easy to publish them on the web. The sketch of Saturn below was made using PaintShop Pro, the night after I made the original scribble on the left.
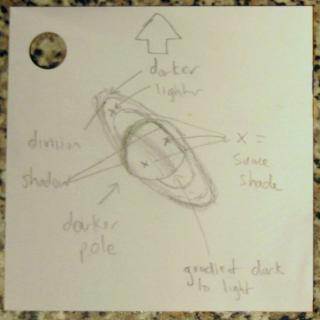 A quick sketch like this can give you a good enough idea of proportion and contrast... | 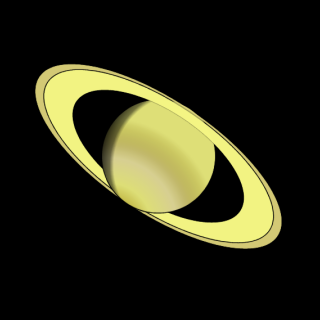 ...to make something like this the following night, when you have time to sit down at the computer. |
For more complex objects, such as open clusters, getting all those details onto paper is a formidable task. Even if you can accurately plot all those stars, you're likely to be busy for hours! For such objects, I often take a quick snap using a digital camera help at the eyepiece. The image of M11 below shows a 15-second exposure I made with my Canon PowerShot S45. As you can see, there's an awful lot of noise, and it's not even that steady or very well focused. It's not going to win any prizes in an astrophotography contest, but you can use such a photo as a basis for a sketch later!
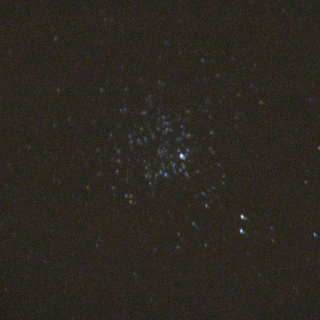 Cropped image of M11 from the digital camera. |
You could of course grab a sheet of paper and copy what you see. If you draw it with a pencil on white paper, you can even scan it and make a negative on the computer, which will give a nice representation of the original view. But seeing as this is a digital photo, why not leave it in the computer and work from there?
Most graphicis packages will support at least basic use of layers. This allows you to use your original photo as a background, and draw over it, as if drawing onto tracing paper or a sheet of acetate. Using a paint brush tool, the size and opacity of the brush varying according to the size and brightness of the individual stars or other details, you can build up a representation of the original image. Removing the layer containing the original photo leaves you with an accurate sketch of the object, which you can then put onto a black background.
I used this technique to produce the image of M11, the Wild Duck Cluster, below. It may help to use a coloured brush to draw in the details, so you can easily see where you're been, then convert the image to a greyscale later. You may then want to play with the brightness and contrast to simulate the view through the eyepiece more accurately.
 The result after removing the original background. | 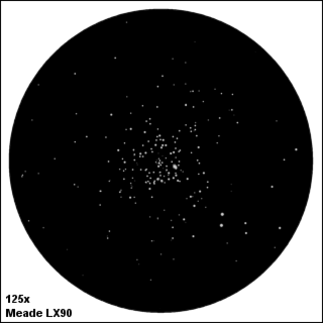 Framed for posterity! |
![]()
![]()
![]()
![]()